In the age of Youtube everyone wants to be a filmmaker. Sometimes it can be a little confusing about how to start, what makes a “good” video, and how to edit that video once you have all of this footage.
Coach Ron Barbani4 left this comment on my last video, after I asked him if him and his wife planned to film their May/June 2020 Arctic Circle trip to Tuktoyaktuk from Atlanta and back.
Coach Ron Barbani
"I do plan on vlogging. It’ll be my first “official” vlog. We have the bikes, camping gear. What we don’t have is all the video and camera gear for vlogging other than Sena 20 communicators. So I’m hoping you’ll do a video on your camera/video gear “how to.” Editing (which you’re great at) and what all it takes to make such videos with voice and music overlays."
So here’s what I use and how I go about making my videos.
I’ll preface this with a warning that I’m not a professional filmmaker, I did go to Art School, but I don’t have any training about how to handle a camera. Everything I know has been from trial and error and watching the how to videos that people like Peter McKinnon and Matti Haapoja put out on their channels. So take all of this with a grain of salt, everyone has something that works for them, and just because I do it this way doesn’t mean you have to do it this way.
I think I take a little bit of a different approach to vlogging than most people’s expectations of a motovlogger. I don’t have a go pro hooked up to a mic in my helmet, there are quite a few examples of these set ups on Youtube. Tim from Forty Times Around just posted his set up. and then there’s Chase on Two Wheels . This is seen as the more traditional MotoVlog set up where you’re seeing the world from the perspective of the rider with a voiceover or a mic in their helmet, and maybe if they’re real fancy they have a perspective from the handlebars looking back at them.
The reason I don’t choose to shoot this way is because when I personally watch content like this I’m often distracted by the engine noise, or I honestly get bored because the visual doesn’t really change from the perspective of the viewer. The sense of depth that we see going down the road is totally flattened when recorded on an action camera. So, there’s nothing keeping my attention besides what they’re talking about. So if they aren’t concise, if I’m not interested in what they’re talking about, or if they’re just kind of rambling and don’t have a well structured speech, they quickly lose my attention. I’m a very visual person and I’m not a patient consumer. I want the information as quickly as possible, in an organized manner, and I want to see pretty things. So that’s what I keep in mind when I make videos, because first and foremost I’m making these videos for myself and then the needs of my audience.
I like to think my style is a little closer to the way that Alex Chacon or Nora create their videos, or even the way that Adventure Spec does the Races to Places show. (Not that I’m anywhere near their quality, they’re just a couple of my heroes and goals I strive for.)
STRUCTURE
I’ll start with structure and story, which you should almost always be thinking about even before you head out on your trip. Introduction to what your viewers can expect in the video, the meat of the video, some kind of highlighted event or topic, and then the conclusion. Which is not that different from the traditional narrative arc;
Introduction to Characters/Foreshadowing of events to come, Rising Action, Climax, Falling Action and Resolution.

If you’re going to be creating a series, you should be thinking of this Story Arc as a kind of idea overlaying the whole series, but also making sure that the introduction/reintroduction and a kind of rising and falling action is included in each episode. Videos in a series are a great place to utilize cliffhangers that keep people wanting to know what happens next, and keeps them coming back for the next video.
When you’re recording a longer trip it is a little bit harder to keep these things in mind, but it will come out naturally in editing depending on how much you recorded, and how much you wrote down. Sometimes things that seemed not important in the moment, happen to be a very important part of the story later. So, do yourself a favor and capture as much as you can even if it doesn’t seem important right then. Everything that you don’t capture or explain in the moment, you’re going to have to try and explain later to fill in the gaps. One of the golden rules of film making is ‘Show, Don’t Tell’. I take this as a strong suggestion. It’s important to have visuals for your audience to look at that is relevant, but also you need to remember that your audience are not mind readers, so remember to let them in on what is happening. That brings us nicely into what Equipment do you use to shoot your vlog.
CAMERAS
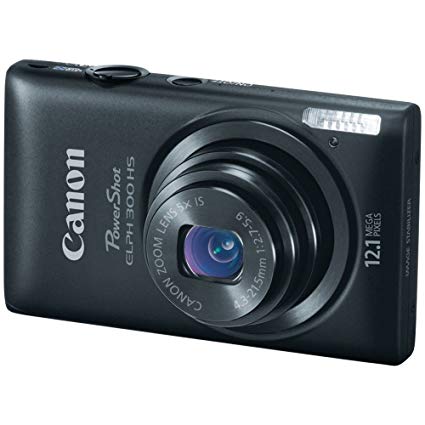
Canon Powershot Elph

Sony A5100

Sony A7Rii
Way way back before I even started my channel I shot on a Canon PowerShot Elph, it had 18mp and it served me well, and if you’re trying to get into vlogging and don’t know a whole lot about lenses, shutter speed etc that’s a good route to go that doesn’t take a whole lot of investment. It’s a very simple point and shoot camera, it won’t have great audio in the wind but for an entry level vlogging camera it will do the job. I will warn you though, if you’re a quick learner you’ll probably outgrow this little guy really fast.
Before I started the Pilgrimage, I knew I needed a camera with a little more options. I wanted to be able to switch lenses, a flip up screen, and the ability to see what the camera saw on my phone - like a remote. So thanks to my amazing grandmother I shot everything you saw on the Pilgrimage (minus the helmet cam footage) on my trusty Sony A5100. In comparison to some of the beefier vlog cameras it’s pretty bare bones. There’s no audio in, and there isn’t a whole lot of options when choosing what frame rate you want to shoot in. But! It allowed me to use my phone as a remote and take whole body selfies much easier, the ability to switch lenses opened up a new world of photography for me, and my personal favorite was that it was a Mirrorless DSLR which meant it took up half the space of a regular DSLR. The flip up screen is fantastic for people who aren’t super comfortable talking to a lens yet. It allows you to look at yourself and pretend like your talking to another person instead of a dead eyed lens. Of course you want to eventually be able to talk directly to the lens since this will allow you to make better eye contact with your audience.
That brings us to my newest addition, the Sony A7Rii. After my A5100 had an unfortunate accident smashing the lens and the screen, I was able to purchase this from The Doctor and the Dropout or @hazerlive on Instagram. I’m so grateful, and I am very slowly getting to know this new tool. I don’t have a flip up screen anymore, but I can still line up my shots via the phone remote app, it has a full frame sensor, and now I can plug in a shotgun mic and feed audio directly into the camera. This is the briefest overview, but I’m excited to learn more and improve!
Another option is the Canon EOS Rebel T6i which is around the $550 mark, or the Canon G7x is a really popular point and shoot vlogging camera on youtube as well.
I have like 3 tripods, I normally take two on trips with me, Tripod 1: Big and Solid, Polaroid 72 Inch Tripod with Quick Release Plate and Tripod 2, which is a generic more portable less stable 52 Inch Tripod. Tripods are important for taking selfies with your bike, and also just being to get footage of yourself when there aren’t other people around to shoot for you. You can also place the camera on a rock or on a fence post, but having the option to set up your camera wherever you want is a better idea than being reliant on having something to set your camera up on. There are definitely a lot of people who are fans of the gorilla pod tripods that will wrap around stuff. I’m just not a fan, they for sure have their fan base though.
I will briefly say I have the Zhiyun Crane-M 3 Gimbal, which I use like ½ of the time, but is really nice to get smooth B-Roll with. Not necessary but nice to have sometimes. I also have a DJI Phantom 3 Pro that I really like, but the size kind of sucks to take on the bike, so I’m going back and forth about whether it would be worth it to get a Mavic because it’d be a little easier to pack, so it’s not taking up as much space as my duffel on the passenger seat. I definitely think that drones are not necessary to document your adventures. You can make a point to climb a little higher to get an aerial view of your bike or whatever when you’re in the mountains, and I think if you make a point to get a lot of different shots from different angles it looks just as good. If you do get a drone please be respectful, read up on the laws, you can’t fly in National or State Parks, in towns without a commercial permit, or near a bunch of people. Also! Use an app like AirMap to make sure you’re not flying in a no fly zone or near an airport.
Helmet Cameras!


Sena’s New 10C Pro
GoPros are of course the industry standard for motovloggers. I’m not a fan, partially because of price point -I’d rather spend my money on a great hand held camera over an action camera, because it affects my vlogs and my photos.
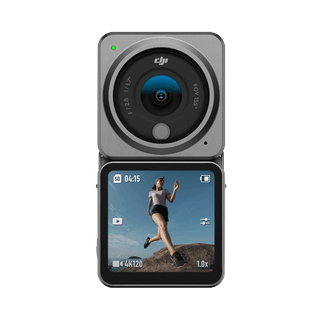
So instead of going the Go Pro route I bought a Contour Roam2. Then upgraded to the DJI Osmo Action, and from there the Osmo Action 2. Since then the Osmo Action 3 has come out and looks like my next action camera when there’s some second hand ones on the market.
If you wanted to motovlog with the Action 2 though, you’d have to use an alternate way to record your audio, like recording from a Sena using your phone or an external lav mic. The 10C EVO is an option, and they’ve also upgraded recently to the 50C recently.
I have also tried some knock off Go Pros, like the AKASO 4k camera, which is what I took to Baja with me, so all of that helmet footage is shot on that. The quality is ok, but I just got frustrated using it, since I had to stop to be able to turn it on and off when I wanted. I purchased the remote for it, but the camera had to be on for the remote to work. It was just too much fuss.
SOUND

Olympus Digital Voice Recorder

Sony ECMCS3 Clip style Omnidirectional Stereo Microphone

RODE Video Micro
Moving on, sound has been a learning process for me.
There are a lot of things your audience will forgive, but bad sound isn’t one of them.
Ya some people will tough it out, but if people have to strain to hear you over wind, engine noise, or because you’re talking too quietly, it’s one of the fastest ways for you to lose a lot of people. Some cameras have pretty ok audio, others need a little help, and if you’re standing any kind of distance away from the camera you need an external mic.
When I do the talking head videos, I have a lav mic and an external audio recorder that I then sync up in Premiere while I’m editing. I have the Olympus Digital Voice Recorder, and the Sony ECMCS3 Clip style Omnidirectional Stereo Microphone. It took me a few tries to learn the ins and outs of my recorder, but I think I’ve got it figured out. At least better than the peaking I was getting because my settings were messed up while I was recording the explanations for the Baja series.
You can also get external mics, the Rode is kind of the industry standard, I just purchased one for my A7Rii to cover the auto focus noise from my lens which is caught on the in-camera microphone. This is mainly for when I’m walking around with the camera and not filming in my garage.
For cameras that don’t have an external mic option, I do recommend getting these little fuzzy dead cats to place over the on camera mics. They will help reduce the wind noise quite a bit.
As for in helmet audio, you can definitely feed a lav mic into your helmet and use an external voice recorder to record your audio and sync it in post. I would recommend a big fluffy dead can to protect your microphone from the wind.
I have also experimented using my Sena 10s to record audio via bluetooth to my phone. I used the Bluetooth Recorder app to record the audio to my phone and export it. So that’s definitely an option if you have a Sena already. I would also recommend getting some kind of chin curtain for your helmet as well, since that will also reduce the amount of wind and engine noise your mic will pick up.
LIGHTING
Try to always consider the lighting in your environment. The absolute best time to shoot is during golden hour, in the morning and the evening. During the middle of the day when the light is super harsh try to find a shaded area to film in so you’re not getting a lot of harsh shadows on your face. If you’re in a dark hotel room, try to shoot next a window and use the natural light. If it’s dark outside, rearrange the lamps to make a two point or three point lighting system.
If you’re in a tent you can try and use your phone, or you can get one of these silly little clip on ring lights. It looks absolutely ridiculous but it's so useful.
If you’re shooting at home or somewhere you can take a little more time setting up equipment you can start setting up some nicer lights. You can absolutely get on amazon and buy a lighting kit with softboxes. I did not do that haha. I do have two of these nice Neewer 160 LED Dimmable Lights that I used to set up on two tripods and cover with white plastic bags as makeshift soft boxes. They’re pretty cheap on Amazon, and the batteries last quite a while.
After I broke my wrist setting those up kind of took too much time to be worth it, so I started just stringing this strip of Dimmable LED lights around, and I’ve been really impressed with the outcomes.
Another alternative you can get for softboxes is the IKEA Regolit Paper Lamp Shades. You can set them up with the way they want you to with their rope and lightbulbs, or you can just buy the lamp shade and stuff the led lights in them and it works just as good.
The basics to remember about three point lighting is that you want a key light, the fill, and the back light.
A key light is a must have. Normally you place this light about 45 degrees to the left or right of your face and a little above your head. The Fill is usually a little dimmer than the key light and you place it 45 degrees to the opposite side of the key light and about the level of the face. The back light, is aimed at the back, like the first two are at 45 degree angle to your left or right. It’s main purpose is to separate you from the background.
You don’t always have to have three physical lights to make this equation happen. You can use a window light as a key light or as a kind of backlight. You can also use a reflector instead of a fill light, which you can easily do with a sheet, or a piece of foam core propped up. Or you can be like me where I cheat and use a string of leds for my key and fill light and if I’m doing good that day and I’m shooting in the daytime, I use the windows in the garage as a kind of backlight.
MUSIC
Do your audience a favor, use something other than the generic ukulele music or that royalty free music that is the first thing that pops up in google when you search “royalty free music download.”
Epidemic Sound is $15 a month for Youtube Creators. I’m not sponsored, but there is a great selection and you can search by mood and tempo.
I try to make sure my background music stays in the background by adjusting the levels, so whatever I’m saying is not competing with the music. Most of the time I only use music in the intro of the video, for b-roll montages and then the outro. I try to make sure whatever music I put in the background matches the mood or feeling I’m trying to communicate with my audience. Of course, most of the time it’s upbeat and adventure, but I actually had a lot of fun editing the video of when I broke my wrist because it was scary. I got to use very different music than I normally do, and little sound effects that you probably don’t even notice. I will say real quick on sound effects, keep it subtle. I never use sound effects at 100%, the point of sound effects is just to add another little sprinkle of salt on top of the main course to bring out the flavors that are already there.
EDITING | THUMBNAILS | UPLOADING
I edit in Premiere Pro, it’s about $20 a month with the Creative Cloud. The free option that is pretty similar is Davinci Resolve which is free for the standard version, and I’ve heard good things about it and it runs on all OSs.
I organize all of my footage into folders based on the camera it came from, then I have an Audio Folder, a Post Video folder for when I have to explain what is happening later in my garage, and a kind of Titles and Images folder. If I’m working a much larger project I’ll try and break it up by what day I shot it then by camera.
I chop up all the bits I want and try to keep it in chronological order and dump it all into the timeline then start chopping it down slowly. I try to cut out as much of the empty pauses as I can. I’m not talking about b roll I’m talking about the awkward gaps while you’re talking, “umms” and excessive “like”s. Even when you’re motovlogging the traditional way, try to keep it concise and to the point. Even if the footage is usable, if it’s not absolutely necessary for getting my point across I’ll cut it out. I end up using about ¼ of the footage of me talking.
Once that’s done, I’ll put in my intro and the outro slides, and I’ll pick music that feels like it’s appropriate then cut all my b-roll to the beat of the music. I think an important thing to remember about B-Roll is that we can take in a lot of information really quickly, so don’t be afraid to keep your shots short. If you have a long pan shot to take in a lot scenery put that near the end of your B-Roll and transition back into talking. Or! You can overlay that nice long shot over top of you talking so you don’t have to worry about it kind of mismatching with the beat of your music.
After I’m done editing the B-Roll and the bits of me talking, I’ll rewatch the whole video like 4 times to make sure everything runs smoothly, I’m hitting all my bases, making sure there’s no part where I feel bored, or jarred by any of the editing. Then I’ll kind of overlay a LUT which is essentially a color grading cheat, and reduce it normally down to 50% Opacity. From there I’ll watch the whole video again and go through and fix the color grading on certain clips to make sure nothing is too dark, or too saturated. It is totally not something you need to think about when you’re first starting, the whole of the Pilgrimage is not color graded at all. I’m definitely not a great example, sometimes it’s a little heavy handed. I’m still learning.
I used an app to make my current title. My S.O. helped me make the maps I used for the Pilgrimage and Baja. I made the maps and he used After Effects to create the route on the map. If you choose to have a title or intro for your videos, I encourage you to switch it up and keep it short around 15 seconds. If you can overlay your title intro over new footage it just makes your videos that much better. For example Fun for Louis has a pretty neat title intro that he overlays on new footage on his vlogs that’s really cool, the title logo stays the same but the footage is different every time.

I’ll take one of the photos I took on the trip, or something that relates to the subject of the video and make the thumbnail in Photoshop. My main tip for thumbnails which I seem to always forget is that the time stamp for your video will always be in the bottom right, so if you put any text down there it will be obscured. Other than that I kind of push the contrast a little and make sure you can see what’s happening in the thumbnail when it’s really tiny.
The golden size for Thumbnails is 1280x720 and the size of your file must stay under 2mb.
Last but not least when I upload the video to Youtube, I try to make sure that all relevant links are always in the description like links to my other social media, my website, and also links or notes anything I talked about like other channels, other videos, or articles. I have a handful of tags that are the same on all of my videos so that at least one of my video is always in the little side suggestion bar when someone is watching one of my videos. Then I try and think about what words people use to search, and also use words that match what is in the title and the description.
I hope that answered some questions. I think my last piece of advice is that if you’re planning to start vlogging for the first time on a long trip, try to start a few days or weeks before you leave. Shoot some short videos and practice editing them so you know what you needed but you didn’t record. You don’t have to use that footage but it will get you used to talking to the camera, including the camera like another person in your life, and also learning what you need to be recording. Don’t be too discouraged when you make mistakes, or when you upload your footage and watch it back and it’s really shaky. There’s definitely a learning curve.
Make videos for yourself first and other people second.